Custom Hang Tag
It seems like everywhere I look these days designers are using more and more handmade objects in their work. From pencil sketches and fabric scans to paper scraps and household odds and ends these items are making their way into our work. In this Photoshop tutorial you’ll learn how to create a retail hang tag.
It seems like everywhere I look these days designers are using more and more handmade objects in their work. From pencil sketches and fabric scans to paper scraps and household odds and ends these items are making their way into our work. In this Photoshop tutorial you’ll learn how to create a retail “hang tag”.
1
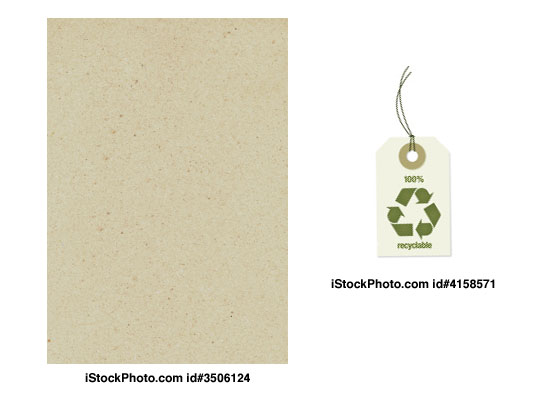
As always I recommend using a little reference material when you’re creating something from scratch that actually exists in the physical world. For today’s lesson I’m using two pieces I found at iStockPhoto, one for the card-stock background and one for the hang tag. By entering the item ID into the iStockPhoto search you can pull up the exact images I’m using.
In this lesson we’ll be using a photo of actual card-stock for the project. If you’d like to learn how to create this effect from scratch check out my Cardboard And Torn Paper Business Card tutorial.
2
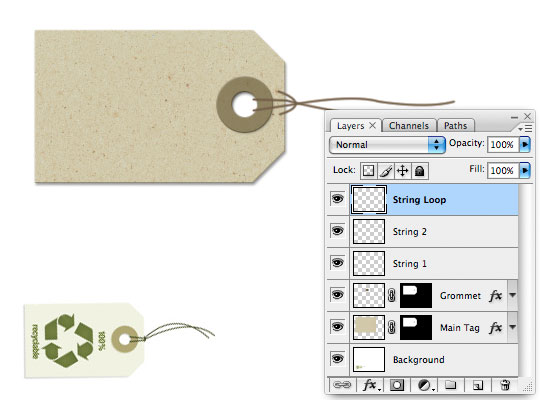
Our first step will be to organize these items on the stage. I’ve merged the reference tag from iStock with the background layer for convenience. (The .PSD file at the end of the lesson will contain both original comp pieces from iStock). I’ve also rotated the card-stock background.
3
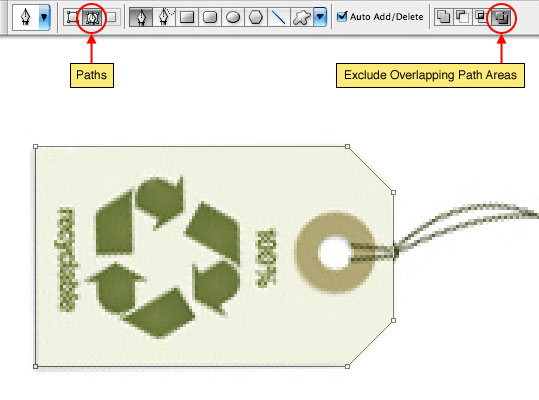
Lets go ahead and create the shape of our tag by tracing the outline of the reference tag with the Pen tool. This will be easy since the outline of the tag is all straight lines. Press the P key to invoke the pen tool and click your way around the outside of the tag until you end up back at your start point.
(*note: This is easier if you zoo in on the tag for a better view.)
4
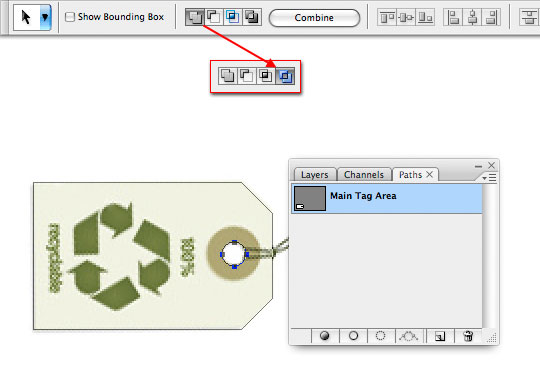
Before we go any further lets click over to the Paths tab in the Layers palette (or by choosing Window>Paths from the main menu) and lets name our path. The reason for this is that if we create a new working path now without naming the one we just created we risk loosing the initial path because if we don’t name it Photoshop assumes we’re done with it.
5
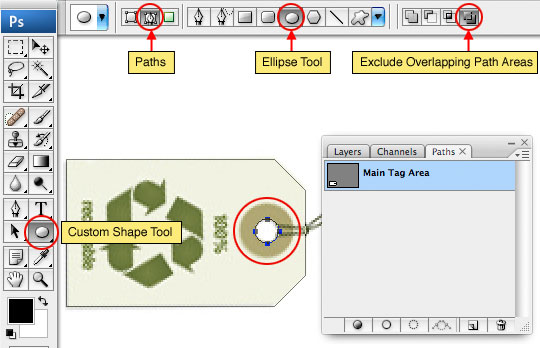
While we still have the Paths tab open and our Main Tag Area path selected lets also add the hole. Press the U key to invoke the Custom Shape tool, in the options bar at the top of Photoshop make sure that the tool is set to Paths, choose the Ellipse tool and make sure the Exclude Overlapping Path Areas icon is selected.
Holding down the Shift key to constrain the circle, click and drag a circular path onto the stage where the hole in the tag is.
6
Sometimes despite our best efforts to do things in the correct order Photoshop can have a mind of it’s own so lets double check and make sure this new circular path indeed has the Exclude Overlapping Paths option actually chosen. Press the A key to switch to the Direct Selection tool and take a look at the options bar at the top of Photoshop. Mine actually had defaulted to the Add To Shape Area option rather than retaining the Exclude Overlapping setting. If this is the case for you, just go ahead and click on the Exclude Overlapping Path Areas icon to switch it. We do this to make sure that the hole is actually cutout of the tag.
7
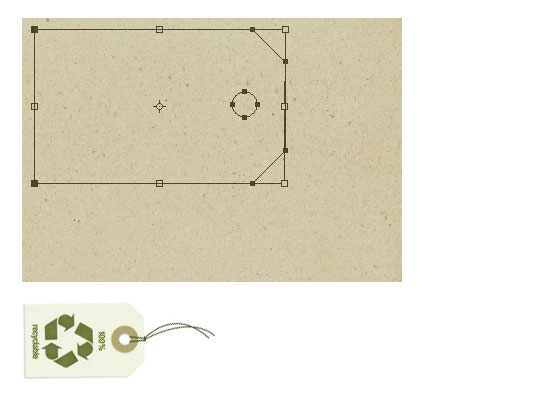
Switch back to the layer tag and with the Direct Selection tool still selected click and drag around the entire path area to select both paths. Move the path over the top of the background texture and press Command-T (PC: Ctrl-T) to invoke the Free Transform tool (yes it works with paths too). Make sure to hold the Shift key as you grab one of the corners of the transform box to constrain the path as you transform it to the size you want to use. Hit the Return (PC: Enter) key when you’ve resized the path to commit the transformation.
8
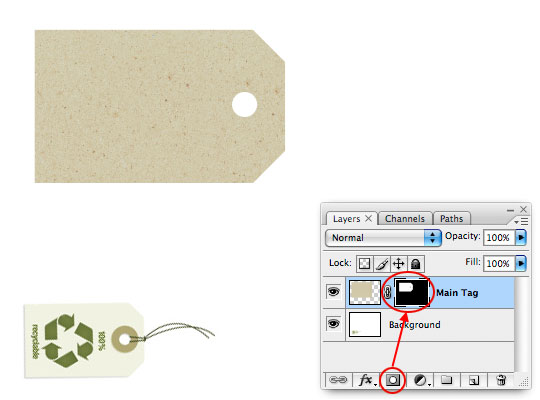
We can convert the selected path to a selection by simply pressing Command-Return (PC: Ctrl-Enter) and then convert the selection to a Layer Mask by clicking the Add Layer Mask icon at the bottom of the Layers palette. (*note: make sure you’ve got the Main Tag layer selected before doing this or the layer mask won’t be applied to the right layer.)
9
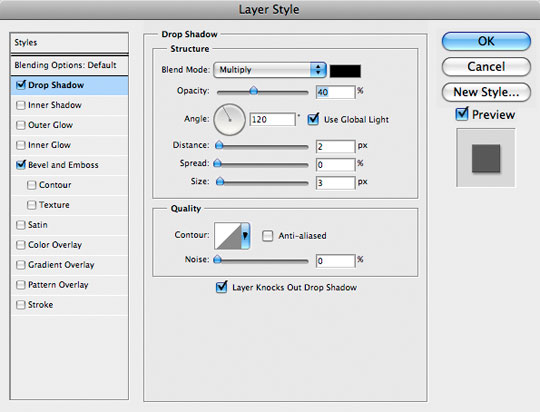
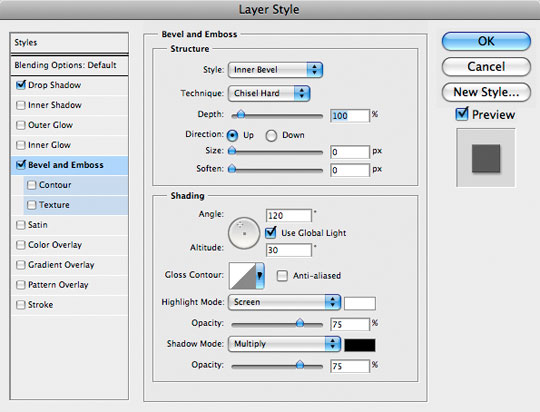
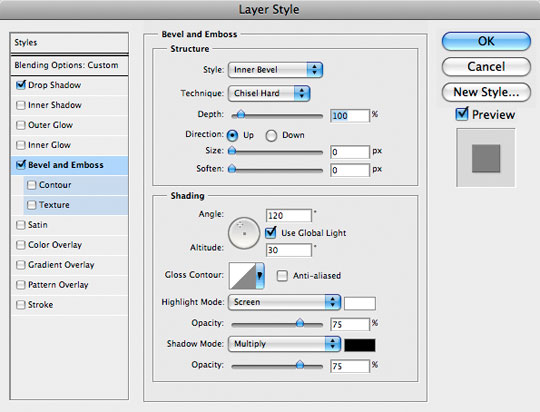
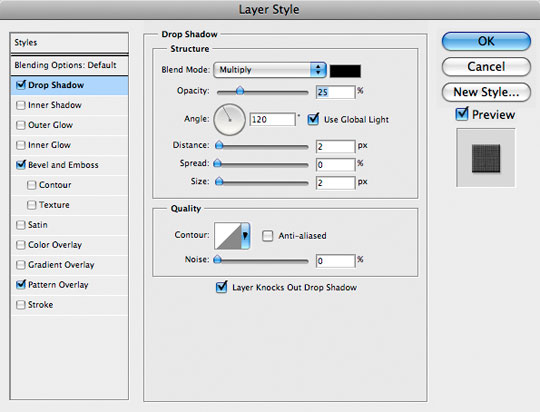
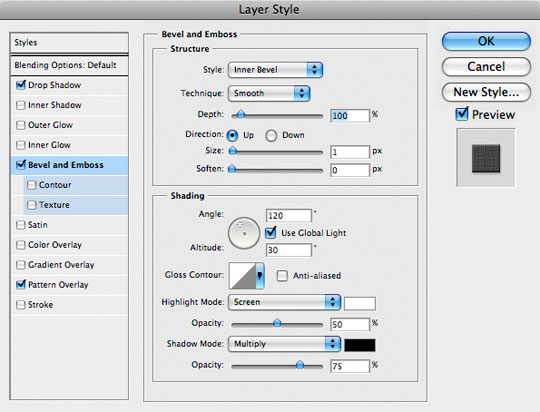
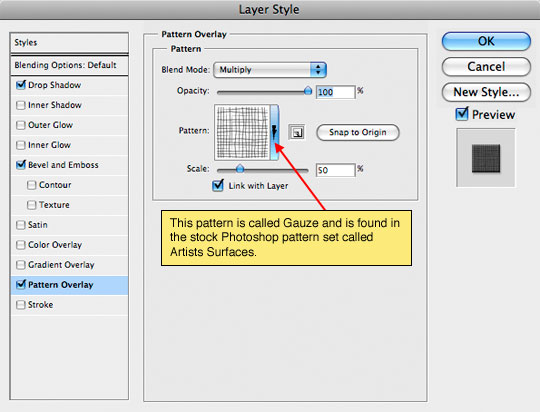
While we’re on this Main Tag layer lets go ahead and add a couple of Layer Styles to it. Command-Click (PC: Right-Click) on the layer and choose Blending Options to bring up the Layer Styles dialog and add the following two styles.
10
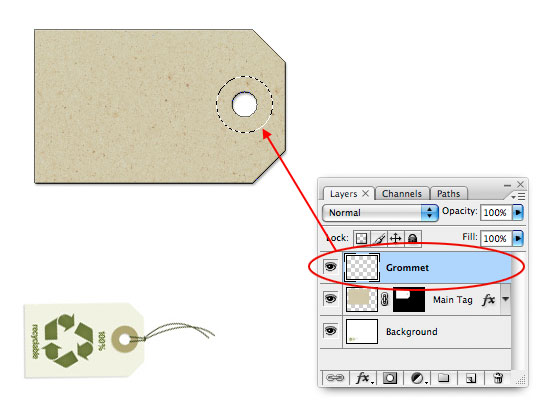
Create a new layer above the Main Tag layer by clicking the Create New Layer icon at the bottom of the Layers palette or by using the keyboard shortcut Command-Shift-N (PC: Ctrl-Shift-N), call this layer Grommet.
Press the M key to switch to the Marquee tool, use the fly out menu in the Tools bar to switch to the Elliptical Marquee tool or you can use the keyboard shortcut Shift-M (PC: Shift-M) to switch between Rectangular and Elliptical once the Marquee tool is selected. Click and drag a selection where the reinforcement grommet will live around the hole in the tag.
11
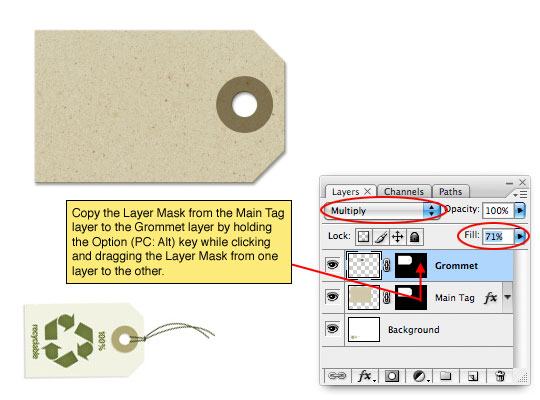
Click the foreground swatch in the Layers palette and change the color to #706340 and click OK, then fill the selection with this new foreground color by pressing Option-Delete (PC: Alt-Backspace).
Lets copy the layer mask from the Main Tag layer to the Grommet layer by holding down the Option (PC: Alt) key and clicking and dragging the layer mask (in the Layers palette) from the Main Tag layer to the Grommet layer. Lets also change the grommet’s layer Blend Mode to Multiply and lower the Fill opacity to 70%.
12
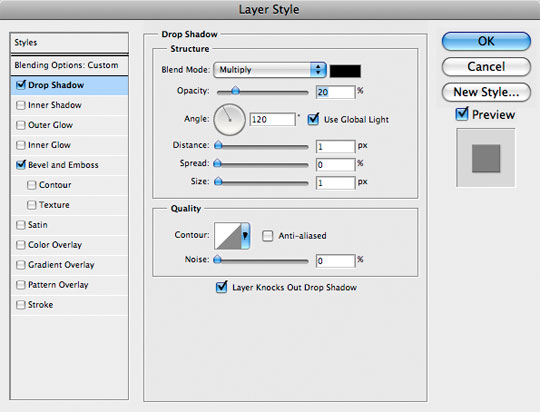
Just like we did in Step 9 lets go ahead and give the Grommet layer a few Layer Styles of it’s own.
13
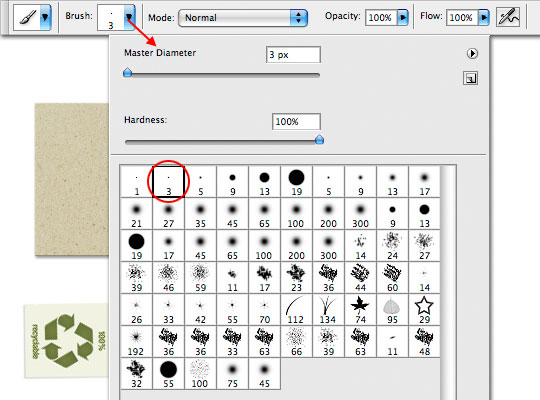
It’s time to add some string to our tag. We’ll do this by drawing a few separate paths and then stroking the path with a brush so lets first press the B key to switch to the Brush tool and we’re going to choose a round hard edged brush with a radius of 3 pixels.
14
Create a new layer called String 1. Change the foreground color to #735e47 and press the P key to switch to the Pen tool. Using the Pen tool click and drag a path onto the stage that will represent our first piece of string coming from the opening of the hole.
15
With the Pen tool still selected Control-Click (PC: Right-Click) on the path and select Stroke Path. Choose Brush from the dialog and make sure Pen Pressure is not checked then click OK. Pressing Command-H (PC: Ctrl-H) when you’re finished will hide the path so you can see what you’ve done.
16
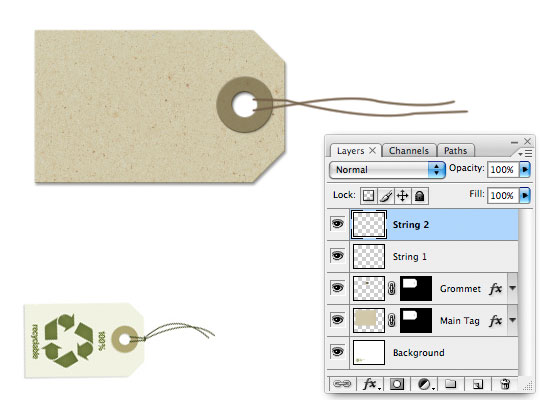
Repeat Steps 14-15 on a new layer called String 2.
17
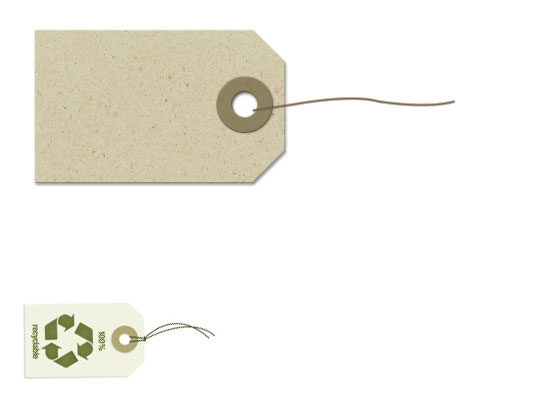
And one last time lets create a path and stroke it to create the loop that wraps from behind the tag around the two strings we just created. I’ll call this layer String Loop. I’m going to draw this path overlapping the tag and we’ll trim it in Step 18.
18
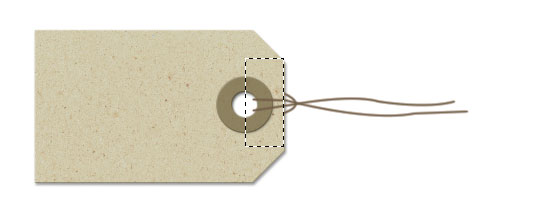
Press M to switch to the Marquee tool, make sure the Rectangular Marquee is selected and then click and drag a selection to the edge of the tag (where we need to cut our loop of string). Press Delete (PC: Backspace) to remove the overlapping string then deselect by pressing Command-D (PC: Ctrl-D).
19
To add a little more realism lets add a Drop Shadow, Bevel & Emboss and Pattern Overlay to our string. You can add these layer styles to any of the String layers and then by holding down the Option (PC: Alt) key you can click and drag the layer style from one layer to the next (just like we did with Layer Masks earlier) to add the same style to all 3 String layers.
(*note: The Pattern Overlay is actually overkill for such a small piece of string, but if you’re creating this at 300ppi for a print project it will add the slightest bit of texture to the string and actually adds to the look nicely. Obviously at 300ppi you’ll need to adjust all the layer styles accordingly as well.)
20
Now that our tag is complete it’s time to put something on it. We’ll want to put the the graphics that will be on the hang tag just above the Main Tag layer and it’s a good idea to create clipping masks from all those layers back to the Main Tag layer so that any graphic that extends beyond the edges of the tag will retain the shape and edge effects of the tag itself.
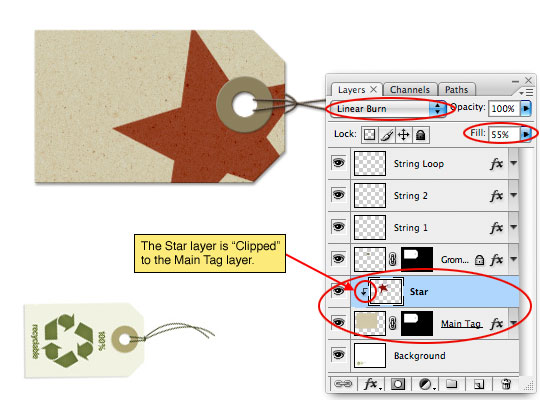
I’ll start by throwing in the obligatory PSHERO star logo by creating a new layer just above the Main Tag layer and calling it Star. I’ve got the logo star saved as a custom shape so I’ll just throw it onto my layer and position it above the tag as desired. Then by Command-Clicking (PC: Right-Clicking) on the layer and choosing Create Clipping Mask I can use the Main Tag layer as a mask for the Star layer. I also switched the layer Blend Mode to Linear Burn and lowered the Fill opacity to 55% to make it look more like the star was printed onto the card.
(*note: By placing the star behind the Grommet layer which has Fill opacity to 70% I could see the star through the grommet, I didn’t like this look so I raised the Fill opacity of the Grommet layer back to 100% and lightened the color a little.)
21
I’ll repeat Step 20 a few more times adding text and a little bit of paint with a grunge brush to get to my final image, and yes, all this is included in the download at the end of the lesson. If you want more instruction on how to age and distress in Photoshop you should check out these tutorials:
Tutorial by PSHERO >> click here.
View our main site: www.october.co.uk
-
Services

October builds brands...
-
Garment Store

October builds brands...
-
Print methods

October builds brands...
-
About Us
October builds brands...